The Cob Oven!
1 October 2017 • Cob Oven, Make

It's done! It's usable! We've used it! It works!
This thing was a mighty labour of love but we couldn't be more pleased with the results! It's a little unrefined at this point. We didn't get around to doing the final finishing layer quite yet, but it's 100% usable as it is right now, and I'm A OK with that.
The final oven step (everything above the base) took us a full morning/afternoon with no kids around. It was by far the most satisfying but nerve wracking part. Would this dirt I dug up actually hold up as building material?! Will it collapse once we remove the sand form?! But alas, it all worked out! The walls are now about 12 inches thick and even when the fire has been burning for a few hours the outside is still cool enough to touch.

It takes about 2-3 hours to heat up the oven so it's hot enough for pizza. Which seems like a lot of wood to use but again our neighbours have been amazing giving us scrap wood so we haven't had to buy any yet. Usually if we're having pizza for dinner I'll start a fire around 2 and throw a few pieces of wood in it every 20 minutes or so when it starts to burn down. Once we're ready to cook the pizzas I use a metal hoe and either remove some of the ash/coals into a metal bucket or push them to the back of the oven. Then, using a wet mop-like tool Dave fashioned out of a scrap fabric and a wooden pole, I'll quickly mop the floor of the hearth to clean up any ash. Then you just slid your pizza right on to the hearth and cook it! It took a while to get the hang of it but now I feel pretty confident making upwards of 10-12 pizzas depending how many people we're feeding.
Words cannot describe how amazing it was to eat the first (albeit slightly charred) pizza from the cob oven. Pizza has never tasted so good! And fast! The first few pizzas only take about a minute to cook.

Our next goal is to build a removable door for the oven so we can start baking bread in it. For bread baking you need to remove all the ash and coals from the oven before you bake. Plus you need a door to keep the residual heat inside. I recently took a sourdough bread making class at Little City Farm (where they bake their bread in a cob oven too) so I'm really excited to try that next.
Some Final Thoughts
- I know I've said this throughout the entire process but I cannot believe that we built this! Using stuff we mostly found and with dirt in our own backyard! It has really opened my eyes up to what we can do if we only take the time and just start
- Our cob oven took all summer to complete but I would say that is 100% due to having two little kids around. Most of the building took place either during naps, once the kids went to sleep or when Dave could fully take on kid duty to free me up to concentrate on the oven. If you don't have kids you could probably get this done in 2 weekends
- I think in total we spent around $150 for everything, not bad!
I'm thrilled and slightly relieved that this project is now complete. It will be so nice to enjoy the oven and move on to a new project :)
I didn't get into the specifics of how we built our oven (it would take forever) but if you are interested in making one of these for yourself you have to check out Kiko Denzer's book. Ours is totally covered in mud and well worn now. Or shoot us an email! We'd be happy to chat more about it :)
The Cob Oven: We Have a Base!
7 August 2017 • Cob Oven, Make

Now we're getting somewhere! The base is complete! This part was really intimidating at first but once I got going it was surprisingly easy. Do I have any experience laying brick you might ask? Nope! I watched a few youtube videos and called myself an expert. Most videos I watched seemed way too intense and technical. I figured I wasn't building a wall for our house or anything so I could probably wing it a bit more than most videos suggested. Here's what I did:
- Filled up the hole with small drainage rock to ground level. (We bought a cubic yard for around $40 and our neigbour with a trailer helped us pick it up. If you have it delivered you pay around $120, yikes!)
- Leveled out the rock layer as much as I could
- Laid the first layer of brick directly on to the rocks and checked it with a level
- Bricked and mortared up until I had used up all the brick (We spent about $25 on mortar)
- Once the mortar had dried for 24 hours we filled the entire base with drainage rock
Is it perfect? Not exactly. But it sure is sturdy and it looks pretty good I think!

No big deal though! I'm just scooping it out and trying again with actual sawdust. I ended up contacting a packing company that a friend told me about and they said I could come by and pick up the sawdust later this week, yay!
In the meantime I'm in the process of sifting the building soil that I'll use to build the oven. Dave whipped up a sifter for me using some scrap wood and hardware cloth (you can see it in the top photo).

So that's where I'm at now! Not too bad! My goal is to have it done before Dave goes back to work in the fall.
I got this.
Backyard Herbology: Yarrow
1 August 2017 • Backyard Herbology, Make, Medicinal Herbs, Yarrow

Recently I took a 4 week Practical Herbalist course at Little City Farm. I learned so much! What was really inspiring was realizing how many useful things grow around us, usually considered as weeds! Last week I was browsing through this book looking at a plant called yarrow when Dave peers over my shoulder and says "Hey, I think we have that growing in the front lawn". Turns out he was right!
Side Note: Turns out when we "forgot" to mow the front lawn for a few weeks a bunch of cool stuff popped up! Besides yarrow we found wild strawberries, thyme and daisies! Love it!


This is one of the first medicinal herb things I've made so I'm curious how it turns out and works later. I've always been a bit skeptical of natural or alternative medicine but hey I'm willing to try new things! Especially when it's just for everyday kind of maladies.

The Cob Oven: Step Two
22 June 2017 • Cob Oven, Make

Not going to lie, it was pretty hard to get through the sod. But I just kept going. Then I hit a layer of straight up rocks. Gah. But I kept going! Wouldn't you know it I dug a 3 foot hole in just about 2 hours! I'm still bragging about it. As someone who has never dug a large hole before I must say it was very satisfying. Then I tamped down the bottom of the hole as much as I could, and filled it with a small layer of drainage rock. Then I just tossed in a bunch of rubble and filled in the holes/gaps with smaller drainage rock until I got close to the top. (I ran out of small rocks so that's not what it's supposed to look like. Work in progress!)
When Dave got home, well, let's just say he was very surprised and impressed (yep, still bragging!).

We've had a few people ask why we're digging down for a cob oven. You don't necessarily have to. Some people build them right on the ground. But, by digging down and filling it with rock it helps with drainage and insulation. We are making an oven so the more heat it can retain the better.
Next steps:
- Brick and mortar up the brick base
- Get some more drainage rock to fill the base
This project has been so satisfying. I have absolutely no building experience and I'm both really surprised and pumped by how I'm doing this lol. You just start and figure out the next step as it happens :)
P.S In case you're wondering, I was sore as hell the next day.
Broody Hens
21 June 2017 • Chickens

Well we've run into our first major snag with the hens. They've gone broody!
Broody pretty much means that they stop laying eggs because they want to hatch some baby chicks. So they pluck out their belly feathers (for skin to egg contact), sit in the nesting box ALL DAY AND NIGHT, and generally turn into little grumps. At first we noticed Nellie wouldn't leave the nesting box and would try to peck us whenever we went near her. She would even do this weird growly thing. So obviously we automatically assumed the worst; "oh man what if there is an egg stuck in her?! Do we call a vet? Can you call a vet for a chicken?!" Then someone in the urban hens community gently pointed out that she was probably just broody.
Which she was.
No big deal.
But then Rosa wouldn't leave the nesting box and then Frida wouldn't either. So three of our four hens are currently not laying eggs. *grumble* To make sure they eat and drink we'll kick everyone out of the coop for the majority of the day, or else they would literally just sit in the nesting box and not leave.

Apparently this will last around 21 days before they snap out of it, or you can take matters into your own hands and try to "persuade" them out of it. We looked into those methods of persuasion but most of them seemed kinda mean. One particular method said to keep the hen separated in a grate bottomed cage and have a fan blowing on her at all times. The idea was to make her so uncomfortable that she forgets how broody she is. Mean right?! So for the meantime we are (somewhat embarrassingly) buying our eggs until they snap out of it.
Note to others:
Some chicken breeds are more prone to "broodiness" than others. Such as bantam varieties. Like Nellie and Rosa...
I Made Kombucha!
16 June 2017 • Fermenting, kombucha, Make

Have you had kombucha before? I think the first time I tried it I was a little weirded out by it. I mean, fermented tea? But lately I've been really getting into it! Surprisingly though made from tea, it doesn't taste like tea. More tangy and fizzy and it's SO good for you. The downside of kombucha is that it's pretty expensive to buy. About $4-5 a serving. Pretty pricey! So (as per usual) I decided to try making my own.
Well, I looked into it. Then I realized why some people are really weirded out by kombucha. One word: SCOBY. Don't google it. Just don't! It's really gross. But it's the key to making kombucha! The scoby is pretty much a goopy little colony for yeast and good bacteria that changes sweetened tea to fizzy tangy kombucha.
So I got over the whole scoby thing and found that a friend on Instagram (thanks Faith!) had a scoby she could give me. Like most things I've been getting into the past while (hello quilting, cob ovens, chickens, babies etc) it seemed a little overwhelming when I first read about it. But one night after the kids went to bed, I watched a few youtube videos and just dove in.
Turns out kombucha is the easiest thing to make. SO EASY. If you have a scoby, can wash your hands, and brew tea you can make kombucha. After I let it ferment (read: sit in the pantry undisturbed) for a week, I scooped out my scoby, which had grown another goopy layer (yum!), and put it in a jar with some of the fermented tea. I can use it again for the next round of kombucha making. I decided to flavour mine and took the extra step of adding some fruit and letting it ferment for another 2 days to build the flavour a bit more and add more carbonation (the bacteria feeds off the sugar in the added fruit and produces gas aka carbonation). After that, I just popped it in the fridge to stop the fermentation and wait for us to drink it!
Yum! For my first batch I just used some good ole Yorkshire Gold black tea that I had in the pantry already and after I divided the kombucha up I added blueberries, ginger, and mango to them. Not gonna lie, I was a bit nervous to drink it. Fermenting is kinda just a fancy was of saying edible mold (right?!) and it's hard to get used to consuming something that you've left out for a week with a bacteria blob floating in there. But what do you know, it's really quite good! Even Iris loves it! Score!
Since originally writing this post 2 weeks ago, I accidentally dropped my entire batch of kombucha (scoby and all) on the kitchen floor. BAH! So I had to start all over with new scobies in a new container. I ended up getting a large ceramic crock-type one with a spigot so now I'm making kombucha on tap pretty much. It's great.
The Cob Oven: Step One
24 May 2017 • Cob Oven, Make
Ok so it looks like we're doing this cob oven project!
When we first had the idea to put one of these things in our backyard it was totally overwhelming. It's easy to look at a big project like this, that's totally out of our comfort zone, and think, "We can't do that! This is crazy! This will be way too hard!" So after spending some time reading about building a cob oven, we're just gonna dive into it. Start with step one and go from there!
So what is step one?
Well, for us it first meant contacting One Call to make sure it was cool to dig in our backyard. We're going to dig down about 3 feet to help insulate the oven and we would hate to ding a pipe or cable line. About 4 different companies came by over the course of last week to do a check and we passed. Yay! So we can dig now.
Second step... check out what kind of soil we have. The whole cob oven will be made up of mostly sand and clay that we dig up in the backyard. You could for sure buy sand and clay but if you have it in your backyard and have to dig down anyway, why not use what you have? We did a cool nerdy test to see what our subsoil was made of. All we did was dig about 30cm down (we did this when we were digging in our garden bed), took a scoop of the soil, put it in a jar, filled it with water and gave it a good shake. Then we just let it settle for an hour to see what we had. Have a look...


As you can see we have an almost perfect 3:1 ratio of sand to clay. Yay! It looks like we won't have to buy any clay or sand to get our ratios right. But we'll see once we start building.
After that: collect materials! We put out a message on Facebook for things like bricks, bottles and urbanite/rubble and got a really great response. People are amazing! We ended up getting a bunch of things we need.
That's about as far as we've gotten! Our next step will be to start digging and filling up the foundation.
So far, so good!
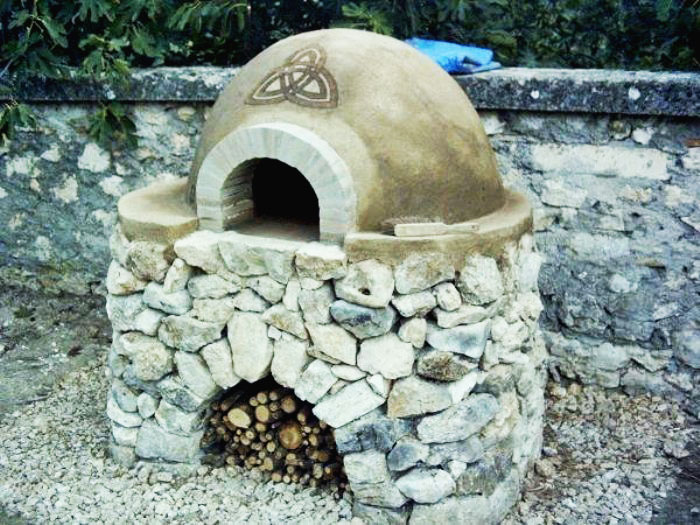
* top photo cob oven by Hendrik Lepel

I've totally hopped on this DIY/crunchy lifestyle train lately. One of the things I've been wanting to try out is creating something from foraged plants in the neighbourhood. Maybe a little strange? Then I saw this blog post and thought "I can do that!" So a few weeks back Dave and I took the kids out for a pre-bedtime stroll around the block with a basket to collect a bunch of violets. We ended up finding about 3 cups worth of violets growing on people's boulevards and lawns. We stayed close to the sidewalk though and didn't venture too far up our neighbours' lawns. I mean, we're not that weird ;)
I should probably mention that I double checked in my edible plants book that what we had collected was indeed violets.
After that I just followed this recipe and made a basic simple syrup from them! The sugar I used was an organic raw sugar and wasn't totally white so my syrup wasn't a lovely purple colour I was hoping for. More like a green brown lol. Ah well. It tasted pretty great with some vodka and sparkling water!
It feels weird that this whole collecting things from nature is so new and exciting to me, yet it's what people did all the time until recently. Whenever I talk to my Oma about the things we're getting up to she always laughs because it's just what she had to do growing up.
Looking forward to scoping out some other edibles around the neighbourhood!
Free Stuff + Awesome Neighbours
10 May 2017 • Garden

Every neighbourhood has that one chatty neighbour. You know the one you may try to avoid making eye contact with when you're in a rush because you know you're bound to be chatting with them for the next 10 minutes? Well Dave may be that neighbour on our street. (Sorry Dave, you know it's true!) If you know Dave you know he's super friendly. One of the great things to come out of his friendliness (apart from knowing ALL the people around us) is that we've scored some really great free stuff for our garden!
When we (read: Dave) started telling people about our big plans for the backyard we were surprised by a) how many of the neighbours invited him to their backyards to check out their AMAZING gardens and b) how many plants people wanted to give us! Our one neighbour down the street turned out to have the most amazing set up in his backyard with fruit trees, berry bushes, giant vegetable gardens and a homemade fire pit. He ended up giving us a few types of mint, raspberry canes, and lilly of the valley he was cutting back.
Another sweet elderly neighbour around the corner (who also has her own large vegetable gardens, grape vines and fruit trees) told us our garden was much too small and bare so she told Dave to come over with some buckets and pointed to all the things he could dig up from her garden to take home to ours. He ended up having to take the car over to get it all! We also got a bunch more raspberry canes from others people too, score!

Another great place we've had luck with acquiring free stuff for the garden is Freecycle and the Trash Nothing app. We've gotten 3 blackberry bush plants off that so far. It's also a great way to pass on stuff we don't need anymore to someone who could use it. One woman who came to pick up our old table base said she was going to use it to make a big trellis type thing for her community garden. So cool! Dave chatted her up for a while too ;)
It's really awesome when you start sharing your passion projects with people and find out that others think it's pretty cool too. Since starting this whole tiny backyard homestead thing I think we've really connected with our neighbours in a way we hadn't before.
Garden update:
- dug in small garden beds along our fence lines for herbs, berries, and pollinators
- found a neighbour who has a rototiller and who we suspect would lend it to us for an afternoon!
- planted our beets, radishes, and some chard seeds in our vegetable garden from last year. I think we're already behind in terms of planting... We've been preoccupied with setting up the coop and enlarging the garden.
The (Future) Cob Oven!
7 May 2017 • Cob Oven, Eat, Make

Wanna hear about our next big project?
The COB OVEN!
What is a cob oven you ask? Pretty much an outdoor wood burning oven made out of cob. Cob = clay+sand+straw. Most people use these types of ovens for pizza but you can also make amazing bread and really anything you would make in a regular oven. I've heard of people who will make these in the morning and use them in the evening for a wedding or some sort of function. Or even kids who make their own tiny ones for a few cookies! Pretty intriguing right?!
A little while back I read an article in Taproot about a man who lived on a beach and made himself a cob oven. Every Friday he would host these pizza nights where he would make a giant batch of pizza dough and people would bring their own pizza toppings. He would spend the night popping these homemade pizzas into his homemade oven and the whole community would get together. So cool right? I love the idea of having something really functional in our backyard that we could share with friends, family and neighbours.
I've been wanting a cob oven in our backyard for a long while now and I recently went to a workshop that Little City Farm put on all about building cob ovens. It was so inspiring! Karin and Greg (of Little City Farm) made their cob oven (pictured above) for about $20. Crazy right?! Pretty much all of the materials can be repurposed or found with the only thing you really need to spend money on being the fire brick for the inside of the oven. The only catch is that cob needs to be somewhat protected by the elements so we would need to build some sort of roof/structure over it. That's the part that's rather daunting for me at this point.
At the workshop Karin and Greg said you could build the oven in about 2 weekends. With one weekend building the base which includes digging down 3-5 feet and filling it with urbanite, and the the brick "table" that it sits on. The second weekend would be used to build the oven part. Then you've got to keep the oven covered from the rain until you build a roof/structure over it.


I learned so much at the workshop in terms of the building materials, making the cob and the whole design process. I also just got this book (Build Your Own Earth Oven by Kiko Denzer) in the mail and oh man, it's so good! Denzer's book makes the whole process seem so easy and do-able! We had originally thought that building a cob oven would be a project that would have to wait till next summer, but after doing the workshop and some research we're thinking we'll try it out it the next few months! The great thing about cob is that even if we totally fail and the thing falls apart, you can just reuse the materials for next time. It's not like concrete where you use it once and it's done.
In the meantime though, I'm going to read up as much as I can and start collecting materials. This is definitely one of those projects I don't want to start until I've got everything gathered and I know exactly what I'm going to do. I'm excited to share the process here! Wish us luck!
p.s If you know of anywhere we could get some old bricks to repurpose, like a building being demolished, a (de)construction site, or anything like that, send us an email! theyoungnunn@gmail.com
The Chicken "Yard"
9 April 2017 • Chickens

We had a couple of options when it came to building it. We ending up using cement footings instead of digging in fence posts. It went up way faster this way, plus if we ever want to move/make alterations to it, this will be much simpler to do. My Dad and Dave got the fence and gate put in within a weekend and we were going to just leave it as is. BUT. Then we noticed that Frida could jump/fly (chickens have the most awkward "flying" ever) on top of the 6.5 foot fence! I looked out the window one afternoon while doing dishes and saw her perched right on top there! Yikes! So this past weekend we added a chicken wire roof on top so we can prevent Frida from flying the coop.

We also added some straw to the run part of the coop but the chickens ended up kicking it out into the whole yard area. They've pretty much eaten the whole section of lawn they have access to and I was getting concerned about how we would be able to keep the area somewhat clean from chicken poop. So, straw seemed like a good idea. Plus it adds to the whole farm feel which I'm definitely (unabashedly) loving.

There is a small area above the gate that we couldn't really add chicken wire to, so I repurposed some wooden stars I had to hang there. Hopefully the stars will deter Frida from ever trying to jump up there. I also "did the Natalie thing" (as Dave says) and found some hanging planters in my craft room to hang up on the outside to make it a little more pretty. I'm hoping to put some geraniums or something colourful in there once the weather levels out a bit. We had a large old wood ladder we picked up at the side of the road last year that Dave sawed down and we added that to the yard for the chickens to climb on. I also thrifted a small (kind of ugly) blackboard that I repainted and hung up for us to keep track of who laid how many eggs, but Iris just likes drawing on it. Ah well. Dave also scored some free blackberry/raspberry plants on Freecycle that we're going to plant along part of the chicken yard fence. Exciting stuff!

$$$$$
Now let's talk about the not-fun part. The cost! All the materials for the yard (wood, cement footings, chicken wire, gate, straw, hardware, etc.) came to about $500. Not cheap!
The straw I found on Kijiji for $5 a small bale and the guy delivered it (and stacked it up so nicely against the house for me!) for an extra $15. I bought 4 bales for a total of $35. I think this will be enough to last us about a month or so.
This stuff adds up! Start-up has been very expensive. We're so lucky to have received our coop for free because that would have been another really big expense.
Maintaining the chickens (feed, pine shavings, oyster shell, grit, etc.) is fairly cheap, so we're still seeing all of this as a really great thing, even if it has been rather expensive to start up.
Dave: So far Nat has written everything here. I just want to add a comment about the cost of chicken keeping. As much as start-up for our chickens has been expensive (very expensive, if your only motivation is to get eggs), I have no regrets about this endeavour. The whole experience, right from the beginning, has been so full of learning. Learning about our city's bylaws (thanks to our neighbours for the extra push, lol), about construction (a more genuine thank you to Nat's Dad), the needs of chickens (the Kitchener Public Library has been a phenomenal resource), organic farming techniques (KPL again), and compost (KPL again!).
Regarding our money, we are constantly faced with a decision on how to spend it. Some people have $100/month cell phone bills, $100/month internet subscriptions, and/or $100/month television packages. We are not those people (I know, we're the weird ones). Instead, we have chickens, ha! And we love them dearly. So yes, there is a financial cost to keeping our chickens. But our other life decisions (read: ultra frugality) make that cost possible to swallow - though it IS still a hard pill to take. All the learning we've done and will continue to do as we tend to our flock of four is worth the spending to us.
Another thing... our family has been spending SO much time hanging out together with the chickens, doing all the chicken things. This family time has really drawn us to homesteading, it's great! So far keeping our vegetable garden, starting up our composting system, and now keeping chickens has increased the Nunn Family Love-o-Meter exponentially. In short, totally worth the $500 ;)
Another thing... our family has been spending SO much time hanging out together with the chickens, doing all the chicken things. This family time has really drawn us to homesteading, it's great! So far keeping our vegetable garden, starting up our composting system, and now keeping chickens has increased the Nunn Family Love-o-Meter exponentially. In short, totally worth the $500 ;)


I really REALLY love having this chicken yard. All four hens gladly come out of the coop right away now in the morning and they all have space to do their own thing so we've seen a lot less bullying. Yay!
(Shout out to my Dad for helping us out so much with this! We couldn't have done it without you!)
This Week on the Homestead
31 March 2017 • Chickens, Garden

Look! They're all outside! Together!
Anyway just thought I'd do a little re-cap of what went on around here this week.
Iris let the chickens out. Ah! She was playing in the backyard and I was feeding Harvey inside when I hear, "Mooooooommy! The chickens are playing!" I pop Harvey in his bed and run outside to see Rosa and Michelle wandering around the backyard. GAH! I asked her why she let the chickens out (while trying in vain to corral them back into the coop) and she says, "Mommy, they needed some exercise. It's ok! They just need some exercise!" Then, laughing like a maniac, Iris started chasing Rosa around the yard. Thankfully my dad was due to stop by any minute so he helped me get Michelle back in the coop. But wouldn't you know it, Rosa found the smallest opening in our back fence (through the cedar trees) and escaped to the neighbour's yard!!!! So then I had to run all the way around the block and figure out which house backed on to ours, knock on their door and pray they wouldn't be upset about a chicken in their yard. Thankfully the woman was more than kind and let me through to her backyard where I managed to scoop Rosa up. Success! Did I mention I had not held a chicken until this incident? I ended up chatting to our neighbour for a bit and she thinks what we're doing is really cool (yay!) and didn't even know we had chickens. Dave and I ended up going back later that day to give her some eggs and a thank you/sorry/nice to meet you card. Anyway holy drama! I think we might need to put some locks on the coop door now...
We have the materials for the chicken yard! My dad had the day off today so he offered to pick up all the materials for us so we can start building tomorrow. Thanks Pops!
Gus has been climbing into the compost and eating it. Ugh. We only have yard waste in the open compost system (we'll talk more about this later), but he somehow finds things to eat in there.
Started planting seeds in the front garden. We have a few types of pollinator seeds that need to be planted a few weeks before the last frost (or in the fall) so I planted some of those in the front. We have a landscape mat under mulch in the front garden so I had to cut through it and fold it under where I wanted seeds to go. Honestly, I'm not sure if this is our best course of action. Maybe I should just take the whole mat out?
The coop needed some TLC. With all the rain we had the wood expanded and made it difficult to open and close. So we had to really force it, which caused a few damages. One of the latches came off as we yanked on it to try to open the door to the nesting box and a wooden latch popped off too.
Started looking at table plans. Hoping to start building the large square table for the patio/gazebo area soon. Still haven't totally committed to a building plan yet though. Not going to lie, this project is really intimidating me. But the thought of having a place where we can have the families and friends over and we can all sit at the same table is so inspiring. It's spurring me on!
Now that we're all healthy again (knock on wood) things are moving along :)
Have a great weekend!
The First Week Or So With the Hens
25 March 2017 • Chickens

Michelle, one our Chanteclers
Overall, I'd say once you have the coop and hens set up, the upkeep of chickens is fairly simple. Although, to be completely fair, Dave did most of the "chicken chores" this week as I was sick so I could be exaggerating.
Dave: Routine maintenance (feeding, cleaning out poop, giving treats, checking for eggs, disinfecting, etc.) is all good. Enjoyable, even. Buuut, we're still in the process of identifying areas of improvement for our current set-up. So, I wouldn't say we've quite settled into a state of easy-maintenance for our chickens yet. There are still a couple of big projects that we're intending to tackle over the coming weekends (i.e., the chicken "yard" - see below for more).

Cleaning out the coop. Frida jumped out onto the ledge while Dave was doing this, but we just gave her a little shove back inside
What daily chicken chores look like (for us): In the morning we let the ramp down and let the ladies out of the coop. Make sure the water isn't frozen and if it is, take it inside and melt it with some hot water and re-fill it. Check their food. Put another waterer down in the run. Maybe leave a treat out in the run. Scoop some poop out. Mid-morning we go out with the kids and check to see if there are any eggs. We find our ladies like to lay in the early afternoon so there's usually not any yet. Afternoon, check for eggs again. Just before the sun goes down we "tuck the ladies in," aka lift the ramp up and secure them in the upstairs part of the coop.
What We Didn't Expect: There are a few things. The first would be that some of the chickens wouldn't want to go in the coop and some would never want to leave the coop. Right now Michelle hardly ever goes into the coop and has only laid us about one or 2 eggs. She'll happily stay in the run all day pecking around for stuff to eat. Nellie on the other hand has only ventured out of the coop once (!) and prefers to cozy up to the feeder upstairs all day long.
When they peck food out of your hand it doesn't hurt at all! Nellie gave Iris a little peck when she tried to pet her while she was laying an egg and Iris wasn't even phased by it.
The coop roof leaks a bit when it rains. Dave had to make a bit of an eavestrough to fix this.
Chickens poop A LOT.
What We love Most So Far: This may be weird but the first thing that comes to mind is how much we're outside everyday! It's great! I love how Iris will ask to go outside just to check out the hens, or to see if there are any eggs. It's amazing to see this whole thing through her eyes. When we find an egg she'll hold it very gently and whisper, "Thank you Nellie." Gah, it's the cutest! Also, the eggs are great, obviously. When we ate our first one I exclaimed how it looked like a Jamie Oliver egg! You know, he always seems to have eggs that have an almost orange yolk. Our eggs are like that!

The elusive Nellie and Rosa, the Bantam Orpintons
Things We're Thinking About Next: How to get Rosa and especially Nellie out of the coop more. We're adding a chicken "yard" next to the run which will pretty much just be a gated and fenced off area where we can "free range" them a bit and give them more space to explore. Real free-ranging (where you let them wander the whole backyard) is off limits according to our municipal by-laws, so this is the next best thing we can do.

Other: Going on vacation. We're lucky to have some really great friends on our street who have offered to look after the hens when we go on a day trip or a vacation. But I think it's a lot to ask to have someone come by twice a day to look after them so it's definitely worth thinking about. It's not like you can just drop them off at the chicken kennel.
It's been a process but we're really enjoying having the ladies here!
Bringing Home the Hens
19 March 2017 • Chickens

You guys! We have chickens in our backyard! Man, it was not an easy week leading up to bringing them home - let me tell you. But first with the fun stuff!! I want to share how we picked our chickens, where we got them, their hopes and dreams, etc... Then... the not-so-fun: some of the issues that have come up for us so far. But first, wanna meet the ladies? We wanted to go with some sort of theme in naming them so we decided to give them all famous-bad-ass-feminists names, ha! So we have Frida, Nellie, Rosa, and Michelle.
Some of you may be wondering why got full sized hens and not chicks. While we would have loved to start our chickens from chicks (they become tame way easier, kids could see them grow, and come on, you know what a baby chick looks like, SO CUTE) we decided that having our own baby at home was probably enough work for us right now. Also keeping some chicks inside with Gus (the dog) around just sounded kinda stressful. So hens it was!

We actually have 2 small black hens as well, but they are super shy and hid out in the coop whenever I came around with my camera.
When we first started looking around locally for hens most people pointed us in the direction of commercial chicken sellers. While the hens from places like that were relatively cheap (around $12 a laying hen), we had heard a lot about how chickens from those places weren't necessarily raised with the TLC we were hoping for. After some research we were really drawn to the fancy pants heritage breed hens. These hens, while more expensive (we paid $30 a hen), are bred to be more winter hardy (they're not bred to live in a commercial chicken house with no windows or fresh air) and people who choose to raise heritage breed animals typically have more invested in the animals so you know they're more cared for.
Anyway it was really hard to find a place that sold heritage breed hens around here! But we ended up finding the coolest place, Happy Hens Heritage Farm. It was a bit of a drive but totally worth it. Marina who runs the show is so sweet and she raises a bunch of different heritage breeds. Plus if you peruse her website you can tell she is totally obsessed and in love with what she does. When we contacted her a few months back she gave us so much great information and answered all of our newbie questions. Since we didn't have a coop at the time (yes, we bought chickens before getting a coop...) she offered to "babysit" them for us and to put our four hens together a week or so before we would come get them so that could get used to each other. When we went to pick them up on Friday she and her husband made us tea while Iris immediately joined their four kids outside to play and we chatted about homesteading and the like. I think we hung out there for like two hours, it was great. We highly HIGHLY recommend them if you're looking for chickens! Here are a few photos from our visit...

Now the issues. Or rather, the main issue. Angry neighbours! Ah! Long story short (kinda), our neighbours (who we've always had a good relationship with) are very opposed to us having chickens. We've always had great relationships with the people in our community and this is the first time someone has had an issue with something we're doing and it totally surprised and stressed us out. They have many concerns (the noise, smell, that their property value will go down, that the birds will die in this weather, predators coming into the yard, etc.). We've tried to reassure them but they pretty much didn't want to have any conversation with us at all and have told us they'd be calling By-Law Enforcement and the Humane Society if we brought the birds home. As someone who absolutely hates confrontation this has been really stressful and frustrating. Don't they know we are nice people?! Don't be mad at us please! It's gotten to the point where we have been in contact with bylaw to double and triple check we are doing everything by the book. Anyway, we've tried all that we can to be friendly and open but it's been disappointing that it's gotten us nowhere. So, we're just going to move on and try not to let it bother us too much. I mean, who doesn't have a grumpy neighbour story right? Our hope is that in a month or two this episode will end, and that these neighbours will have come to the realization that: the chickens have no impact on them at all (noise, odor, attracting pests, etc.), and that we are doing a FABULOUS job keeping our ladies happy and healthy.

We put a "decoy" egg in the nesting box so the ladies will know that's where they should lay their eggs. It worked! That egg is from Rosa or Nellie, the small bantam chickens.
I'm hoping to do a coop tour next and give you an idea of all the stuff we had to get ($$). But I should probably just stop now. I can already tell we're going to be those annoying chicken obsessed people, ha!
-Nat
We Have Chicken Coops + An Update!
4 March 2017 • Chickens


Yay!
Today we rounded up a bunch of free things people had set aside for us including not one, but two chicken coops, some pallets, hay bales, and some chicken paraphernalia. This fall when we mentioned we wanted to raise a few chickens we had two families jump at the opportunity to pass off their used coops to us. (Should we have taken that as a warning sign? Hmmmm...) One of the families had had chickens for a few years but their kids lost interest in it, and the other family had a similar situation but with the added terror of having a rat problem with theirs (I know, signs! We choose to ignore these!). Anyway, we traded coops for family photoshoots (I'm a photographer) just to say thanks and there you have it, practically free chicken coops!
We plan on using the top pictured coop as of now. We have the roof off in the picture but you can probably get a general idea of how it works (I'll do a chicken coop tour post later once the ladies have moved in). The bottom photo coop is the one that had a rat problem with theirs (the mom added that her son would throw the chicken feed all over the backyard so we're thinking the problem stemmed from that, not from the actual chickens) but anyway it needs a bit more TLC than the other. We're going to see if we can repurpose it at all or pass it on to someone else.
We also got a few hay bales (or is it straw? We're still figuring these kinds of things out) that we're likely to use as mulch between the garden beds and Dave plans on using the pallets for our composting system.

The current view of (part of) the backyard. Dave says it looks kinda junky, but I get butterflies seeing all this cool stuff coming together!
You know what this means?! We can have our hens move in soon! Like total dorks, we've already picked out their names and everything and they're currently living at Happy Hens Heritage Farm until we're ready to pick them up. And if the weather holds up this may be sooner than we expected, woot!
-Nat
Lacto-Fermenting Workshop!
18 February 2017 • Eat, Fermenting, Make, Pickles

Today I went to a really cool workshop at one of my favourite places in town, Little City Farm. LCF is one of our biggest inspirations when it comes to backyard homesteading and they run a variety of really interesting workshops there throughout the year. Everything from soap-making to chicken keeping for beginners (check out their website to see what else they're up to!). Today I went to "The Art of Fermentation: An Intro to Lacto-Fermenting." I am a huuuuge fan of all things pickled (it's practically all I ate when I was pregnant with Harvey) so I was pretty pumped to learn how to make fermented things without vinegar or that didn't require traditional canning methods - you know the kind where you sterilize a bunch of jars, heat them up and all that jazz.

So I'm not going to lie, initially the phrase "lacto-fermenting" sounded pretty odd ball to me. But turns out it's one of the original ways to preserve food and maintain almost all of the nutrients in the food. I personally always thought that pickled things had to be made with a vinegar, is that just me? Anyways, these don't use any vinegar (mind blown) but a sea salt brine and a "probiotic starter" which the instructor told us was just equal amounts of red cabbage and water blended together, strained, and then left to do its thing for a few days. These types of pickles are FULL of probiotics and are great for your gut. Nice!
A few key things I learned...
- don't make pickles with tap water! Tap water here (in Kitchener-Waterloo) has chlorine and fluoride in it, which kill most bacteria including the good bacteria you want to make pickles
- chop everything small so the bacteria can really get at the veggies
- use a cabbage leaf on the top to push down the veggies and keep everything submerged in the brine
- use organic veggies - most veggies and fruits have this almost powdery film on them (you can really see it on a red cabbage). This is called a bloom and it is where all the good bacteria live. You want this on your veggies and fruit!
We got to make and take home a giant jar of pickles that we made at the end of the class and I'm really excited to try them after they ferment for a few weeks on top of the fridge.


What a lovely way to spend a few hours this afternoon, in a sunny greenhouse making pickles with a bunch of ladies.
Now I really want to pick up this book and pretty much ferment all the contents of our fridge ;)
-Nat
The Bee Dialogues
12 February 2017 • Bees

I've JUST begun exploring the possibility of keeping honey bees in our backyard in the past 5 months, and I love sharing my excitement with friends, family, and colleagues. It's perhaps unsurprising to you that my excitement has drawn mixed reviews, lol. Some of the responses I've received...
"Aren't they dangerous??"
"Your backyard sounds like a really "kid-friendly" place... [tongue firmly in cheek]."
"Dude, aren't they illegal?"
You may be thinking these things too, and that's cool! So I thought I'd answer them here to give you a better idea...
"Aren't they dangerous??"
Typically, no. Wasps and hornets are more aggressive than honeybees. They sting freely. With reckless abandon. Honeybees, on the other hand, are much more conservative stingers. Their stingers are barbed, so when a bee gives you a love-tap her stinger becomes stuck in her victim (I say "her" because male bees cannot sting). Some of the bee's innards get left behind along with her stinger. Result? A dead bee and a cussing human. Generally, honey bees will only sting when they feel threatened, or they think their colony is threatened (specifically, their brood and their food).
"Your backyard sounds like a really "kid-friendly" place... [tongue firmly in cheek]."
Darn right! It may not be the norm in 2017, but our kids are loving our adventure into vegetable gardening and the like so far. Part of what motivates Nat and I to homestead is the resulting quality time together as a family. Homesteading has led to more time talking, planning, working, playing, and enjoying the literal fruits and veggies of our labours. Consequence? More loooooooove in the home. On another note, the bee hive will be placed at the back of the yard surrounded by some shrubs to provide a bit of division from the rest of the backyard. But to be honest, we want the kids to see and (eventually) be able to interact with the hive. I mean, what an amazing learning experience! We also plan on having both kids tested before we get the bees to ensure they're not allergic.
"Dude, aren't they illegal?"
I have looked into the legality of beekeeping in our city. The answer is yes, they're illegal... BUUUUUUT I'm going for it anyways. Because it's worth it (I'll chat more about this later). With my neighbours' blessings, careful planning, and of course the best of intentions, I think I'll be able to prevent any issues. *Fingers crossed ;) Sidenote: Keeping chickens was illegal for years until this year and people all over the city still had them. Just sayin'.
The Bee Dialogues I have with others are obviously a little easier if my chat-mate's reaction is positive. I HAVE had some of these! Which is sweeeeet! So exciting! But even if my friend's knee-jerk impulse is to shy away from bees the conversation still has the potential to lead to topics related to agriculture, food, organics, pesticides, and sustainability. Again, Nat and I admit this is pretty hippy-dippy, but maybe we should all be a little more hippy-dippy if it's good for our health and good for the Earth.
-Dave
Seeds Have Arrived!
3 February 2017 • Garden, seeds

We have seeds! Woot!
We spent quite some time trying to figure out where to get our seeds from this year. Not gonna lie, prior to this I would just grab them at Home Depot (obviously... being picky about where you buy seeds is, perhaps, strange). This year, after some research, we knew we wanted organic, non-genetically modified seeds, and varieties that are somewhat native to our area. Supporting a family-owned, organic, seed-saving farm sounded like the most hippy-dippy and Portlandia-like move (the only step we omitted here was also visiting the farm to ensure our seeds were treated humanely). Long story short, we ended up going with Hawthorn Farms which is about an hour from us and hits all of our requirements. Score! I had requested a hardcopy catalogue, and last weekend when we had a date night we brought it along, got some food and hot chocolate and then ordered all of our seeds. The future bounty of the garden!
The plan is to re-plant our front garden with all pollinators/bee friendly plants. This will attract more bees which in turn will help out our garden and keep our local bees happy, well-fed, and healthy. Bees are having a hard go of it right now so this is an easy way to help. So, we ordered a bunch of native pollinator plants as well as vegetable seeds too.
We may have gone a little seed crazy and ordered A TON OF SEEDS. But if we store them properly we can keep them for a few years.
The next step seed-wise is to wait until, you know, winter is done. Ha! There are a few varieties that need a "cold moist stratification" (I'm just trying to impress you now), so we can start those ones soon in the fridge since we missed out on planting them in the ground at the end of fall.
Progress guys. Progress.
- Nat
Subscribe to:
Posts (Atom)