I Made Deodorant...
13 March 2019 • Make

6 years ago I would have rolled my eyes at anyone who told me that they made their own deodorant.
Deodorant is just another one of those things that you don't really think too much about when you buy and use it everyday. But if you really stop and think about what exactly you're slathering on your skin everyday for years and what happens to all those plastic containers once you throw them out... I don't know it makes me feel a little uncomfortable. Anyway all I'm saying is that even if you do roll your eyes at home made deodorant, you probably get why people move away from the store bought stuff more and more.
This one I whipped up using really basic ingredients: shea butter, coconut oil, beeswax, cornstarch, baking soda and essential oils for smell. I melted everything together and poured it into a jar and presto, deodorant! I eyeballed this recipe and just used a little less beeswax to make it more spreadable with my fingers.
Does it work you ask? For me, yes! Surprisingly well! If you went from using Degree deodorant to this it probably wouldn't work that well at first. I've been using store bought natural deodorants for a few years now but I found initially my body really needed a good 2 week transition time from drugstore deodorant to natural deodorant. Apparently your arm pits go through a bit of a detox. It's a thing!
Does it work as good as an antiperspirant you would buy at the store? Of course not! But I'm willing to compromise a bit (having to give my armpits a little wash every night before bed) if it means I can feel good about what I'm putting on my skin and not having yet another plastic thing to throw out.
Amazing Two Ingredient Ice Cream
26 February 2019 • Eat

I realize ice cream is not on the minds of many people this time of year. But I've been making and eating this like crazy the past few weeks so I thought I'd share. And it's so easy! I'd say it even tastes better than anything I was making in my ice cream machine (RIP).
For the base all you do is whip 2 1/2 cups of whipping cream and stir in one can of sweetened condensed milk. Cover the surface with plastic wrap and freeze. Yeah that's it.
I make it a bit "fancier" by first steeping a few Earl Grey tea bags and a tablespoon of dried lavender in the cream over lowish heat. After that I just chill the cream and strain out the tea bags and lavender and then whip it up before adding the condensed milk. I'm dying to stir some goat cheese and berry compote in the next batch. That may just be the baby hormones talking, but that sounds good right?!
I still find this a bit on the sweeter side, but hey it sure beats anything you can buy at the grocery store!
The Eggless Winter
20 February 2019 • Chickens

After what seems like a very long eggless winter we are just starting to get some eggs in the morning again! This must mean that spring is coming soon. Right? (RIGHT?!) We had gotten into the habit of buying our eggs at the grocery store the past few months so it's been exciting to pluck 2 or 3 warm eggs out of the coop in the mornings again.
In other chicken news, about a month ago we lost Nellie in a rather tragic hawk attack. Yikes! We've always let the hens out every once in a while to free range in the backyard and had never had any issues. Being out of the chicken yard is way more stimulating for them plus there's something about doing the dishes and glancing up out of the window and seeing a few chickens wandering around out back.
Anyway on the day of the incident the hens were out and I had let Gus out back. Well he booked it right for the coop and I saw this rather large hawk fly out of the run and perch on a tree above the coop. I was at home alone with the kids at the time and may have yelled "Ah! A hawk!" which of course prompted both kids to run to the window and look. You couldn't see anything from the house but the hawk stayed perched in the tree for a good 20 minutes and Harvey kept pointing to it and shouting "Hawk up high!". Anyway long story short, poor Nervous Nellie met her demise. I kept telling myself as I was getting her out of the run and throwing more straw over the blood (I know) that this was a part of keeping chickens. But man, not what you pictured yourself ever doing!
The other chickens had scattered and we couldn't find them for hours. We thought maybe the hawk had gotten them too but ended up finding Michelle cowering beside the sandbox totally still and Betty and Dolly had somehow squeezed through the back fence and had hidden under the neighbours wood pile. Iris crawled back into the cedar bushes to look for them and Betty came running to her and then Dolly came back once Dave came home and went out to look. Rosa had run into the coop and was squawking her head off (understandably).
So I think we may be done with free ranging for a bit! At least until the weather is nicer and someone is out there with them. We have the "allowed" number of hens now and with a new baby coming this June we don't have any plans to get chicks this spring. Hoping we get another summer of eggs from the ladies we have!
Winter Days (& Nights) at Home
31 January 2019 • around here, Family

Ah winter. I am sure I am not the only one who romanticizes winter during the hotter months then when it actually arrives...yeah. With these extra cold days and nights lately where it's not advisable to be outside (even forest school was cancelled!) it's made for some long days at home let me tell you. We've been leaning hard into fires in the wood stove, lots of tea, hobbies, making art, baking, naps, cooking and obviously lots of Berenstain Bears and Little Bear on Youtube.


We recently enrolled Iris in JK a few days a week in the school down the road. I was really apprehensive about it at first but if you know Iris, you know she is extremely outgoing and chatty so she's been loving school. I've loved meeting all the families in our neigbourhood and I'm excited for her to have friends she can hang out with just down the street. Another nice bonus is that Harvey and I have been getting some days just the two of us. We both miss Iris during those days, but I can't deny that it is much quieter around the house for a few hours. Not better, just different :)

Looking forward to this extreme cold spell being done soon. Harvey stares out the window longingly every morning wanting to go out and shovel.
Winter Reading
6 December 2018 • books, Home, winter

Every fall and winter I love to really hunker down into some good books. Now that my kids are old enough to entertain themselves (for the most part) and I don't have to worry about them swallowing dimes from behind the couch (for the most part) I've been able to actually sit down and read more than a paragraph at a time. Yay! And I would much prefer my kids to see their mama reading all the time than scrolling on her phone.
A few winters ago I re-read the entire Harry Potter series. Never gets old. I cannot wait for our kids to be old enough to really get Harry Potter. We've tried with Iris but she had a hard time keeping all the characters straight and you could tell she was totally boggled by why the Dursley's were so mean to Harry. Bless her. We'll try again next year ;)
Last week we all got the stomach flu so we had a lot of time (between all the laundry and fun stuff that goes with the stomach flu) to sit and read and I ended up reading books 3-7 of Harry Potter again. Like I said, Harry Potter never gets old!
Last winter I tackled just one book and that was Anna Karenina by Leo Tolstoy. What a brick of a book! But so wonderful! Not gonna lie, sometimes that Levin character would just go on and on about peasant farming methods and I would doubt my choice, but I just loved the timeless insights into family life. And I feel kinda weird saying this but Tolstoy really captured the complexities of motherhood so well.
Anyway, this snowy season I've started in on The Hobbit and The Lord of the Rings trilogy which I've never read before. I just finished The Hobbit last night and wow was it was better than I thought it would be! I also have Gone with the Wind sitting on my shelf and it's looking pleasingly dense and perfect for a winter read.
If you have any book series to recommend, hit me up!
---------------
On an unrelated side note: doesn't the wood stove look great?!
Getting Back To Our Normal
27 November 2018 • Family

Well as you may have heard we have a new Nunn arriving this June! Baby number three, oh boy! We had planned this baby but once the hormones kicked in and the dreaded "Pregnant Natalie" returned I had some second thoughts on what we were possibly thinking. Life was just starting to feel kinda "easy" again, why did we throw Pregnant Natalie and a soon-to-be-newborn into the mix?!
The past two months have been hard. So so very hard. I am happy to be pregnant and excited about this new kid, BUT pregnancy is not a fun time for me. We kind of forgot how hard it is, not just on me but the whole family. For me, I get really sad, feel nauseous 24/7 and disengage from the entire family. I don't want to parent, I don't want to cook and I cannot bring myself to really contribute in any way. It's rough! I felt like a total failure and burden. Poor Dave, he really had to become a single parent for a while there all while trying to keep me from falling completely into a dark and hazy state. Thank goodness for our parents! I honestly don't know how we would have survived without all their help. And help from friends! People who dropped off food or just sent me a message to see how we were doing or to even commiserate about the trials of growing a person. All of it was so appreciated.
During those two months we completely abandoned all of regular crunchy routines. Cloth diapers? UGH too much work, just put Harv in a disposable when we go out. Using the cloth wipe spray? Well as soon as that ran out I didn't feel like making more. Getting outside every day with the kids? I could cry just thinking of the process of getting two kids dressed and outside. Nope, unlimited Netflix it is! Making bread and food from scratch? HA! The kids lived off PB and J, cereal and fruit for 8 weeks. Things I did not have to cook or think about. It made me realize how living a more hands-on life really requires a certain amount of privilege. As soon our home life became stressed and I became unwell, all of those things immediately became unattainable.
At one point during a day where were eating cereal for lunch, the dog hadn't been walked in over 3 weeks, I had just finished crying at the table, and the kids were whining about watching even more Netflix after lunch Dave looked at me and said in a half joking way, "You know, I think this is a real low point for the Nunn family. We're barely functioning right now!"
Now I'm slowly starting to feel more like myself which we are all incredibly grateful for. When I ate a full dinner for the first time at my parents house recently I thought my mum was going to cry tears of joy lol. I'm getting cookbooks out at the library again, seeing friends, cooking real food, and saying no to Netflix more often. I cry, tops, once a day! Life is starting to feel good again and I'm starting to look forward to each day rather than dreading it.
I hate to get cheesy here but you know the saying how you can't appreciate the good times unless you have the bad times too? It really is so true. Sometimes the bad times seem to go on forever but then you slowly make your way back to the good times and it's like being able to breathe out of your nose again after being stuffed up for weeks. You suddenly get to appreciate all the little things you took for granted before. Like having an appetite. Actually enjoying your kids. Having the energy to walk the dog. Helping someone else instead of being the one being helped. I could go on forever.
Here's to new babies and making it through hard times!
The night after I wrote this both kids came down with the dreaded barfing flu. Ha! Back to the hard times I see for a while yet! Ah such is life.
Painting on the Walls
27 September 2018 • Crafts, Home


When we first bought our house the entire thing was painted this dark salmon colour (ugh!). We ended up painting all the walls in the entire house white. Not even "cloud white" but straight-outta-the-can eggshell white and I loved it! We have a very...hmmm....eclectic (?) style so having white walls means there is no colour scheme and everything we put on the walls just magically works. It's great!
You know what else is great about white walls? It's very easy to paint on them. I don't know why it took me so long to get to the idea of painting directly on the walls. When I first learned about Maud Lewis, oh man, was that ever an eye opener for me. "This woman just paints on every surface of her tiny house?" I was so inspired! I remember watching Maudie and mentioning to Dave "Wow, I really want to paint on our walls now" and he (surprisingly) said "yeah, go for it!"
So when I had the house to myself for a few hours I just did it. I stared at the wall with my paints on a plate, totally second guessing the idea (what if it looked bad?!) and I just started painting. I painted some flowers by the coat rack and loved it so much I did some above the light switch as well. I kept telling myself, "well if it's weird or Dave hates it I'll just paint it white again".


This planter I saw on Pinterest

Ooko I copied from a library book
I don't have any tattoos but people who have them are always saying you get one and you immediately want another. I feel this way about painting on my walls. I'm itching to do something in kitchen now...
The Current Brood
21 September 2018 • Chickens


I've realized that so much has changed since the last time I wrote about the chickens! Here's a little update if you're curious :)
Sadly, we lost one of hens this summer. Good ole Frida. By far our favourite hen! The only one that would stand still when the kids came near and let them pick her up. She got something called an impacted crop which I guess is pretty common for chickens. We knew that it would eventually kill her so when we got a text from our house sitter while on vacation we weren't too surprised. Iris was very sad though. When she's overtired she'll still sob "oh I miss Frida! She was my best chicken!". Poor girl!
To be honest I'm quite surprised that we haven't lost any of the other hens to predators! I've jinxed it now but we live pretty close to a conservation area so we've kind of prepared ourselves for something to snatch a hen. So far so good!
In happy hen news, this past spring we got two baby chicks! Iris saved up her allowance for months and was so excited to buy her own "babies". We let her name them and she went with Dolly (Parton; Jolene is one of her favourite songs) and Betty (if Harvey was a girl he was going to be named Betty so she heard the name a lot. Guess that name's out for our next kid!). And oh man, I will forever get baby chicks instead of pullets now! The temperament of Betty and Dolly is so different than the others which we got as full grown hens. Betty and Dolly will follow us around out back, aren't nervous around Gus, and let the kids pick them up so easily. Dream chickens! Plus their colours! So beautiful!
In terms of eggs, we only get about 3 eggs a day from the 5 hens. Which I mean, if you were doing it for the eggs isn't the best lol. Factory egg layers are typically killed after a year since their production goes down so much but our chickens are more pet chickens now I suppose. I remember before we got them Dave and I thought "well we'll just get them butchered when they stop laying and use them as soup chickens" but then you name them, the kids (and let's be honest, Dave and I) begin to adore them and you can't possibly imagine having them killed regardless of how little eggs they are producing. Pretty soon we'll be running an eggless chicken nursing home ;)
This time last year we we're getting nervous about the coming winter and if the hens would survive the cold. This year we have another whole year of experience under our belts and are confident that everything will be just fine.
----------------
We buy all our hens from this amazing farm called Happy Hens Heritage Farm. It's a bit of a drive but the owner, Marina, is so kind and helpful. She gave us a little how-to booklet when we picked up our chicks and has (happily!) answered many of our questions for us as we venture into this chicken adventure. Highly recommend her farm if you're looking into chickens, especially interesting breeds.
Hello Again!
14 September 2018 • Family


Hello again! I've really been feeling the urge to write and blog again lately so I thought I'd pop in here and spruce things up a bit :)
The past few weeks have been very full around here. Dave went back to work, our wood stove got installed (!!), we did a tiny reno (read: put up shelves) in our kitchen, were handed down Dave's moms piano that had to get moved in (!!) and the kids and I are settling into a different routine with just the three of us during the day now.
We've been spending lots of time at home lately. I've been trying really hard to let the kids be and what a difference this has made in our days! Being the one staying at home with them, I've always felt this pressure to be doing something with them all the time and really planning out our whole day. Which, surprise, left me feeling like I had no time to do my own thing and the kids were constantly nagging me to entertain them.
I hesitate to use the word ignore, but essentially for most of the day now I just get on with my own things and let them be. If they're safe, and not destroying the house (the bar is low here people lol) then I just let them be. Even if that means they've pulled out all the crayons and dumped them on the carpet to find the perfect shade of pink, I just let them be. To be honest, sometimes I just have to leave the room because I find it so hard not to interrupt them and shout "Gah! Don't do that!".
What a change! I've noticed the kids will play with each other so much more, and they've become so much more engaged in their own little worlds and activities. It's so lovely to see! Plus I've been able to read SO MUCH more and work away on my own projects. Instead of waiting for the kids to go to bed to have some "me time" I just do it during the day.
What a revelation!
This makes feel so optimistic about the coming winter and spending more time together inside :)
---------------------
This book was really inspiring to back off and let the kids be : The Idle Parent by Tom Hodgkinson
Around Here
17 January 2018 • around here, Family, Home
 Oh hello! Long time no see! Just thought I'd check in and share a little about what's going on around here.
...That makes it seem like I have big news or something. A new baby?! We bought miniature goats?! Nope nope nope nothing like that.
At the end of the fall Dave and I pulled the trigger and bought a wood burning stove! We had a bit of money saved up and decided we could afford a small renovation. Our top choices were either a dishwasher or a wood burning stove. Although a dishwasher would have probably been the more practical choice there's something about a wood burning stove that just screams COZY and HYGGE that a dishwasher simply can't compare with. We have to wait till the spring to get it installed in the living room so we aren't enjoying it this winter but we're stoked to have it for next winter! We live in a small bungalow so we do all of our living on one floor of the house so we'll be able to use the stove to (most of the time) heat the house in the winter which, come on! Doesn't that sound amazing?! The house will always smell like woodsmoke and chopped wood *swoon*. Our modern Little House on the Prairie dreams are pretty much all coming true.
Now that winter has definitely settled in I'm starting to feel the dreaded cabin fever. Over the holiday break we didn't play outside once because there were extreme cold warnings every day and now it seems like we're stuck in the rut of playing indoors most days now. Ugh! Must get outside every day!


The chickens live on! Near the end of the summer Dave shingled the coop roof and added a small extension to the back to give the hens a bit more room. We were wondering how they would do in the winter but they've been really great so far! Surprisingly they come outside and walk around in the snow every day and Rosa is still laying an egg every other day or so. We haven't had to add a heat lamp or anything, but we do have to bring the water in every night and fill it with boiling water in the morning so it doesn't freeze as fast.
Trying very hard to fully enjoy and appreciate the winter and not wish it away for spring but man, it can be hard! In the meantime we've been drinking lots of tea, reading so many books (I recently took up reading Anna Karenina and there is nothing like Russian literature for the wintertime!), and Iris just started Forest School for the winter semester so there's that!
Hope you're all enjoying your winter :)
The Cob Oven!
1 October 2017 • Cob Oven, Make

It's done! It's usable! We've used it! It works!
This thing was a mighty labour of love but we couldn't be more pleased with the results! It's a little unrefined at this point. We didn't get around to doing the final finishing layer quite yet, but it's 100% usable as it is right now, and I'm A OK with that.
The final oven step (everything above the base) took us a full morning/afternoon with no kids around. It was by far the most satisfying but nerve wracking part. Would this dirt I dug up actually hold up as building material?! Will it collapse once we remove the sand form?! But alas, it all worked out! The walls are now about 12 inches thick and even when the fire has been burning for a few hours the outside is still cool enough to touch.

It takes about 2-3 hours to heat up the oven so it's hot enough for pizza. Which seems like a lot of wood to use but again our neighbours have been amazing giving us scrap wood so we haven't had to buy any yet. Usually if we're having pizza for dinner I'll start a fire around 2 and throw a few pieces of wood in it every 20 minutes or so when it starts to burn down. Once we're ready to cook the pizzas I use a metal hoe and either remove some of the ash/coals into a metal bucket or push them to the back of the oven. Then, using a wet mop-like tool Dave fashioned out of a scrap fabric and a wooden pole, I'll quickly mop the floor of the hearth to clean up any ash. Then you just slid your pizza right on to the hearth and cook it! It took a while to get the hang of it but now I feel pretty confident making upwards of 10-12 pizzas depending how many people we're feeding.
Words cannot describe how amazing it was to eat the first (albeit slightly charred) pizza from the cob oven. Pizza has never tasted so good! And fast! The first few pizzas only take about a minute to cook.

Our next goal is to build a removable door for the oven so we can start baking bread in it. For bread baking you need to remove all the ash and coals from the oven before you bake. Plus you need a door to keep the residual heat inside. I recently took a sourdough bread making class at Little City Farm (where they bake their bread in a cob oven too) so I'm really excited to try that next.
Some Final Thoughts
- I know I've said this throughout the entire process but I cannot believe that we built this! Using stuff we mostly found and with dirt in our own backyard! It has really opened my eyes up to what we can do if we only take the time and just start
- Our cob oven took all summer to complete but I would say that is 100% due to having two little kids around. Most of the building took place either during naps, once the kids went to sleep or when Dave could fully take on kid duty to free me up to concentrate on the oven. If you don't have kids you could probably get this done in 2 weekends
- I think in total we spent around $150 for everything, not bad!
I'm thrilled and slightly relieved that this project is now complete. It will be so nice to enjoy the oven and move on to a new project :)
I didn't get into the specifics of how we built our oven (it would take forever) but if you are interested in making one of these for yourself you have to check out Kiko Denzer's book. Ours is totally covered in mud and well worn now. Or shoot us an email! We'd be happy to chat more about it :)
The Cob Oven: We Have a Base!
7 August 2017 • Cob Oven, Make

Now we're getting somewhere! The base is complete! This part was really intimidating at first but once I got going it was surprisingly easy. Do I have any experience laying brick you might ask? Nope! I watched a few youtube videos and called myself an expert. Most videos I watched seemed way too intense and technical. I figured I wasn't building a wall for our house or anything so I could probably wing it a bit more than most videos suggested. Here's what I did:
- Filled up the hole with small drainage rock to ground level. (We bought a cubic yard for around $40 and our neigbour with a trailer helped us pick it up. If you have it delivered you pay around $120, yikes!)
- Leveled out the rock layer as much as I could
- Laid the first layer of brick directly on to the rocks and checked it with a level
- Bricked and mortared up until I had used up all the brick (We spent about $25 on mortar)
- Once the mortar had dried for 24 hours we filled the entire base with drainage rock
Is it perfect? Not exactly. But it sure is sturdy and it looks pretty good I think!

No big deal though! I'm just scooping it out and trying again with actual sawdust. I ended up contacting a packing company that a friend told me about and they said I could come by and pick up the sawdust later this week, yay!
In the meantime I'm in the process of sifting the building soil that I'll use to build the oven. Dave whipped up a sifter for me using some scrap wood and hardware cloth (you can see it in the top photo).

So that's where I'm at now! Not too bad! My goal is to have it done before Dave goes back to work in the fall.
I got this.
Backyard Herbology: Yarrow
1 August 2017 • Backyard Herbology, Make, Medicinal Herbs, Yarrow

Recently I took a 4 week Practical Herbalist course at Little City Farm. I learned so much! What was really inspiring was realizing how many useful things grow around us, usually considered as weeds! Last week I was browsing through this book looking at a plant called yarrow when Dave peers over my shoulder and says "Hey, I think we have that growing in the front lawn". Turns out he was right!
Side Note: Turns out when we "forgot" to mow the front lawn for a few weeks a bunch of cool stuff popped up! Besides yarrow we found wild strawberries, thyme and daisies! Love it!


This is one of the first medicinal herb things I've made so I'm curious how it turns out and works later. I've always been a bit skeptical of natural or alternative medicine but hey I'm willing to try new things! Especially when it's just for everyday kind of maladies.

The Cob Oven: Step Two
22 June 2017 • Cob Oven, Make

Not going to lie, it was pretty hard to get through the sod. But I just kept going. Then I hit a layer of straight up rocks. Gah. But I kept going! Wouldn't you know it I dug a 3 foot hole in just about 2 hours! I'm still bragging about it. As someone who has never dug a large hole before I must say it was very satisfying. Then I tamped down the bottom of the hole as much as I could, and filled it with a small layer of drainage rock. Then I just tossed in a bunch of rubble and filled in the holes/gaps with smaller drainage rock until I got close to the top. (I ran out of small rocks so that's not what it's supposed to look like. Work in progress!)
When Dave got home, well, let's just say he was very surprised and impressed (yep, still bragging!).

We've had a few people ask why we're digging down for a cob oven. You don't necessarily have to. Some people build them right on the ground. But, by digging down and filling it with rock it helps with drainage and insulation. We are making an oven so the more heat it can retain the better.
Next steps:
- Brick and mortar up the brick base
- Get some more drainage rock to fill the base
This project has been so satisfying. I have absolutely no building experience and I'm both really surprised and pumped by how I'm doing this lol. You just start and figure out the next step as it happens :)
P.S In case you're wondering, I was sore as hell the next day.
Broody Hens
21 June 2017 • Chickens

Well we've run into our first major snag with the hens. They've gone broody!
Broody pretty much means that they stop laying eggs because they want to hatch some baby chicks. So they pluck out their belly feathers (for skin to egg contact), sit in the nesting box ALL DAY AND NIGHT, and generally turn into little grumps. At first we noticed Nellie wouldn't leave the nesting box and would try to peck us whenever we went near her. She would even do this weird growly thing. So obviously we automatically assumed the worst; "oh man what if there is an egg stuck in her?! Do we call a vet? Can you call a vet for a chicken?!" Then someone in the urban hens community gently pointed out that she was probably just broody.
Which she was.
No big deal.
But then Rosa wouldn't leave the nesting box and then Frida wouldn't either. So three of our four hens are currently not laying eggs. *grumble* To make sure they eat and drink we'll kick everyone out of the coop for the majority of the day, or else they would literally just sit in the nesting box and not leave.

Apparently this will last around 21 days before they snap out of it, or you can take matters into your own hands and try to "persuade" them out of it. We looked into those methods of persuasion but most of them seemed kinda mean. One particular method said to keep the hen separated in a grate bottomed cage and have a fan blowing on her at all times. The idea was to make her so uncomfortable that she forgets how broody she is. Mean right?! So for the meantime we are (somewhat embarrassingly) buying our eggs until they snap out of it.
Note to others:
Some chicken breeds are more prone to "broodiness" than others. Such as bantam varieties. Like Nellie and Rosa...
I Made Kombucha!
16 June 2017 • Fermenting, kombucha, Make

Have you had kombucha before? I think the first time I tried it I was a little weirded out by it. I mean, fermented tea? But lately I've been really getting into it! Surprisingly though made from tea, it doesn't taste like tea. More tangy and fizzy and it's SO good for you. The downside of kombucha is that it's pretty expensive to buy. About $4-5 a serving. Pretty pricey! So (as per usual) I decided to try making my own.
Well, I looked into it. Then I realized why some people are really weirded out by kombucha. One word: SCOBY. Don't google it. Just don't! It's really gross. But it's the key to making kombucha! The scoby is pretty much a goopy little colony for yeast and good bacteria that changes sweetened tea to fizzy tangy kombucha.
So I got over the whole scoby thing and found that a friend on Instagram (thanks Faith!) had a scoby she could give me. Like most things I've been getting into the past while (hello quilting, cob ovens, chickens, babies etc) it seemed a little overwhelming when I first read about it. But one night after the kids went to bed, I watched a few youtube videos and just dove in.
Turns out kombucha is the easiest thing to make. SO EASY. If you have a scoby, can wash your hands, and brew tea you can make kombucha. After I let it ferment (read: sit in the pantry undisturbed) for a week, I scooped out my scoby, which had grown another goopy layer (yum!), and put it in a jar with some of the fermented tea. I can use it again for the next round of kombucha making. I decided to flavour mine and took the extra step of adding some fruit and letting it ferment for another 2 days to build the flavour a bit more and add more carbonation (the bacteria feeds off the sugar in the added fruit and produces gas aka carbonation). After that, I just popped it in the fridge to stop the fermentation and wait for us to drink it!
Yum! For my first batch I just used some good ole Yorkshire Gold black tea that I had in the pantry already and after I divided the kombucha up I added blueberries, ginger, and mango to them. Not gonna lie, I was a bit nervous to drink it. Fermenting is kinda just a fancy was of saying edible mold (right?!) and it's hard to get used to consuming something that you've left out for a week with a bacteria blob floating in there. But what do you know, it's really quite good! Even Iris loves it! Score!
Since originally writing this post 2 weeks ago, I accidentally dropped my entire batch of kombucha (scoby and all) on the kitchen floor. BAH! So I had to start all over with new scobies in a new container. I ended up getting a large ceramic crock-type one with a spigot so now I'm making kombucha on tap pretty much. It's great.
The Cob Oven: Step One
24 May 2017 • Cob Oven, Make
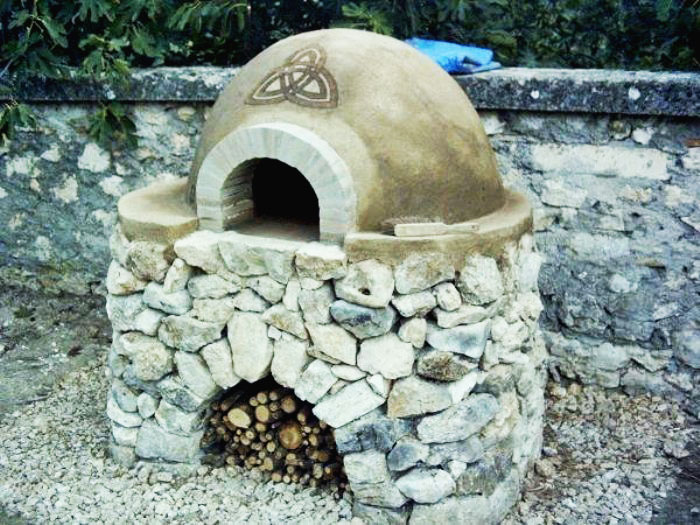
Ok so it looks like we're doing this cob oven project!
When we first had the idea to put one of these things in our backyard it was totally overwhelming. It's easy to look at a big project like this, that's totally out of our comfort zone, and think, "We can't do that! This is crazy! This will be way too hard!" So after spending some time reading about building a cob oven, we're just gonna dive into it. Start with step one and go from there!
So what is step one?
Well, for us it first meant contacting One Call to make sure it was cool to dig in our backyard. We're going to dig down about 3 feet to help insulate the oven and we would hate to ding a pipe or cable line. About 4 different companies came by over the course of last week to do a check and we passed. Yay! So we can dig now.
Second step... check out what kind of soil we have. The whole cob oven will be made up of mostly sand and clay that we dig up in the backyard. You could for sure buy sand and clay but if you have it in your backyard and have to dig down anyway, why not use what you have? We did a cool nerdy test to see what our subsoil was made of. All we did was dig about 30cm down (we did this when we were digging in our garden bed), took a scoop of the soil, put it in a jar, filled it with water and gave it a good shake. Then we just let it settle for an hour to see what we had. Have a look...


As you can see we have an almost perfect 3:1 ratio of sand to clay. Yay! It looks like we won't have to buy any clay or sand to get our ratios right. But we'll see once we start building.
After that: collect materials! We put out a message on Facebook for things like bricks, bottles and urbanite/rubble and got a really great response. People are amazing! We ended up getting a bunch of things we need.
That's about as far as we've gotten! Our next step will be to start digging and filling up the foundation.
So far, so good!
* top photo cob oven by Hendrik Lepel

I've totally hopped on this DIY/crunchy lifestyle train lately. One of the things I've been wanting to try out is creating something from foraged plants in the neighbourhood. Maybe a little strange? Then I saw this blog post and thought "I can do that!" So a few weeks back Dave and I took the kids out for a pre-bedtime stroll around the block with a basket to collect a bunch of violets. We ended up finding about 3 cups worth of violets growing on people's boulevards and lawns. We stayed close to the sidewalk though and didn't venture too far up our neighbours' lawns. I mean, we're not that weird ;)
I should probably mention that I double checked in my edible plants book that what we had collected was indeed violets.
After that I just followed this recipe and made a basic simple syrup from them! The sugar I used was an organic raw sugar and wasn't totally white so my syrup wasn't a lovely purple colour I was hoping for. More like a green brown lol. Ah well. It tasted pretty great with some vodka and sparkling water!
It feels weird that this whole collecting things from nature is so new and exciting to me, yet it's what people did all the time until recently. Whenever I talk to my Oma about the things we're getting up to she always laughs because it's just what she had to do growing up.
Looking forward to scoping out some other edibles around the neighbourhood!
Free Stuff + Awesome Neighbours
10 May 2017 • Garden

Every neighbourhood has that one chatty neighbour. You know the one you may try to avoid making eye contact with when you're in a rush because you know you're bound to be chatting with them for the next 10 minutes? Well Dave may be that neighbour on our street. (Sorry Dave, you know it's true!) If you know Dave you know he's super friendly. One of the great things to come out of his friendliness (apart from knowing ALL the people around us) is that we've scored some really great free stuff for our garden!
When we (read: Dave) started telling people about our big plans for the backyard we were surprised by a) how many of the neighbours invited him to their backyards to check out their AMAZING gardens and b) how many plants people wanted to give us! Our one neighbour down the street turned out to have the most amazing set up in his backyard with fruit trees, berry bushes, giant vegetable gardens and a homemade fire pit. He ended up giving us a few types of mint, raspberry canes, and lilly of the valley he was cutting back.
Another sweet elderly neighbour around the corner (who also has her own large vegetable gardens, grape vines and fruit trees) told us our garden was much too small and bare so she told Dave to come over with some buckets and pointed to all the things he could dig up from her garden to take home to ours. He ended up having to take the car over to get it all! We also got a bunch more raspberry canes from others people too, score!

Another great place we've had luck with acquiring free stuff for the garden is Freecycle and the Trash Nothing app. We've gotten 3 blackberry bush plants off that so far. It's also a great way to pass on stuff we don't need anymore to someone who could use it. One woman who came to pick up our old table base said she was going to use it to make a big trellis type thing for her community garden. So cool! Dave chatted her up for a while too ;)
It's really awesome when you start sharing your passion projects with people and find out that others think it's pretty cool too. Since starting this whole tiny backyard homestead thing I think we've really connected with our neighbours in a way we hadn't before.
Garden update:
- dug in small garden beds along our fence lines for herbs, berries, and pollinators
- found a neighbour who has a rototiller and who we suspect would lend it to us for an afternoon!
- planted our beets, radishes, and some chard seeds in our vegetable garden from last year. I think we're already behind in terms of planting... We've been preoccupied with setting up the coop and enlarging the garden.
The (Future) Cob Oven!
7 May 2017 • Cob Oven, Eat, Make

Wanna hear about our next big project?
The COB OVEN!
What is a cob oven you ask? Pretty much an outdoor wood burning oven made out of cob. Cob = clay+sand+straw. Most people use these types of ovens for pizza but you can also make amazing bread and really anything you would make in a regular oven. I've heard of people who will make these in the morning and use them in the evening for a wedding or some sort of function. Or even kids who make their own tiny ones for a few cookies! Pretty intriguing right?!
A little while back I read an article in Taproot about a man who lived on a beach and made himself a cob oven. Every Friday he would host these pizza nights where he would make a giant batch of pizza dough and people would bring their own pizza toppings. He would spend the night popping these homemade pizzas into his homemade oven and the whole community would get together. So cool right? I love the idea of having something really functional in our backyard that we could share with friends, family and neighbours.
I've been wanting a cob oven in our backyard for a long while now and I recently went to a workshop that Little City Farm put on all about building cob ovens. It was so inspiring! Karin and Greg (of Little City Farm) made their cob oven (pictured above) for about $20. Crazy right?! Pretty much all of the materials can be repurposed or found with the only thing you really need to spend money on being the fire brick for the inside of the oven. The only catch is that cob needs to be somewhat protected by the elements so we would need to build some sort of roof/structure over it. That's the part that's rather daunting for me at this point.
At the workshop Karin and Greg said you could build the oven in about 2 weekends. With one weekend building the base which includes digging down 3-5 feet and filling it with urbanite, and the the brick "table" that it sits on. The second weekend would be used to build the oven part. Then you've got to keep the oven covered from the rain until you build a roof/structure over it.


I learned so much at the workshop in terms of the building materials, making the cob and the whole design process. I also just got this book (Build Your Own Earth Oven by Kiko Denzer) in the mail and oh man, it's so good! Denzer's book makes the whole process seem so easy and do-able! We had originally thought that building a cob oven would be a project that would have to wait till next summer, but after doing the workshop and some research we're thinking we'll try it out it the next few months! The great thing about cob is that even if we totally fail and the thing falls apart, you can just reuse the materials for next time. It's not like concrete where you use it once and it's done.
In the meantime though, I'm going to read up as much as I can and start collecting materials. This is definitely one of those projects I don't want to start until I've got everything gathered and I know exactly what I'm going to do. I'm excited to share the process here! Wish us luck!
p.s If you know of anywhere we could get some old bricks to repurpose, like a building being demolished, a (de)construction site, or anything like that, send us an email! theyoungnunn@gmail.com
Subscribe to:
Posts (Atom)