The Cob Oven: Step One
24 May 2017 • Cob Oven, Make
Ok so it looks like we're doing this cob oven project!
When we first had the idea to put one of these things in our backyard it was totally overwhelming. It's easy to look at a big project like this, that's totally out of our comfort zone, and think, "We can't do that! This is crazy! This will be way too hard!" So after spending some time reading about building a cob oven, we're just gonna dive into it. Start with step one and go from there!
So what is step one?
Well, for us it first meant contacting One Call to make sure it was cool to dig in our backyard. We're going to dig down about 3 feet to help insulate the oven and we would hate to ding a pipe or cable line. About 4 different companies came by over the course of last week to do a check and we passed. Yay! So we can dig now.
Second step... check out what kind of soil we have. The whole cob oven will be made up of mostly sand and clay that we dig up in the backyard. You could for sure buy sand and clay but if you have it in your backyard and have to dig down anyway, why not use what you have? We did a cool nerdy test to see what our subsoil was made of. All we did was dig about 30cm down (we did this when we were digging in our garden bed), took a scoop of the soil, put it in a jar, filled it with water and gave it a good shake. Then we just let it settle for an hour to see what we had. Have a look...


As you can see we have an almost perfect 3:1 ratio of sand to clay. Yay! It looks like we won't have to buy any clay or sand to get our ratios right. But we'll see once we start building.
After that: collect materials! We put out a message on Facebook for things like bricks, bottles and urbanite/rubble and got a really great response. People are amazing! We ended up getting a bunch of things we need.
That's about as far as we've gotten! Our next step will be to start digging and filling up the foundation.
So far, so good!
* top photo cob oven by Hendrik Lepel

I've totally hopped on this DIY/crunchy lifestyle train lately. One of the things I've been wanting to try out is creating something from foraged plants in the neighbourhood. Maybe a little strange? Then I saw this blog post and thought "I can do that!" So a few weeks back Dave and I took the kids out for a pre-bedtime stroll around the block with a basket to collect a bunch of violets. We ended up finding about 3 cups worth of violets growing on people's boulevards and lawns. We stayed close to the sidewalk though and didn't venture too far up our neighbours' lawns. I mean, we're not that weird ;)
I should probably mention that I double checked in my edible plants book that what we had collected was indeed violets.
After that I just followed this recipe and made a basic simple syrup from them! The sugar I used was an organic raw sugar and wasn't totally white so my syrup wasn't a lovely purple colour I was hoping for. More like a green brown lol. Ah well. It tasted pretty great with some vodka and sparkling water!
It feels weird that this whole collecting things from nature is so new and exciting to me, yet it's what people did all the time until recently. Whenever I talk to my Oma about the things we're getting up to she always laughs because it's just what she had to do growing up.
Looking forward to scoping out some other edibles around the neighbourhood!
Free Stuff + Awesome Neighbours
10 May 2017 • Garden

Every neighbourhood has that one chatty neighbour. You know the one you may try to avoid making eye contact with when you're in a rush because you know you're bound to be chatting with them for the next 10 minutes? Well Dave may be that neighbour on our street. (Sorry Dave, you know it's true!) If you know Dave you know he's super friendly. One of the great things to come out of his friendliness (apart from knowing ALL the people around us) is that we've scored some really great free stuff for our garden!
When we (read: Dave) started telling people about our big plans for the backyard we were surprised by a) how many of the neighbours invited him to their backyards to check out their AMAZING gardens and b) how many plants people wanted to give us! Our one neighbour down the street turned out to have the most amazing set up in his backyard with fruit trees, berry bushes, giant vegetable gardens and a homemade fire pit. He ended up giving us a few types of mint, raspberry canes, and lilly of the valley he was cutting back.
Another sweet elderly neighbour around the corner (who also has her own large vegetable gardens, grape vines and fruit trees) told us our garden was much too small and bare so she told Dave to come over with some buckets and pointed to all the things he could dig up from her garden to take home to ours. He ended up having to take the car over to get it all! We also got a bunch more raspberry canes from others people too, score!

Another great place we've had luck with acquiring free stuff for the garden is Freecycle and the Trash Nothing app. We've gotten 3 blackberry bush plants off that so far. It's also a great way to pass on stuff we don't need anymore to someone who could use it. One woman who came to pick up our old table base said she was going to use it to make a big trellis type thing for her community garden. So cool! Dave chatted her up for a while too ;)
It's really awesome when you start sharing your passion projects with people and find out that others think it's pretty cool too. Since starting this whole tiny backyard homestead thing I think we've really connected with our neighbours in a way we hadn't before.
Garden update:
- dug in small garden beds along our fence lines for herbs, berries, and pollinators
- found a neighbour who has a rototiller and who we suspect would lend it to us for an afternoon!
- planted our beets, radishes, and some chard seeds in our vegetable garden from last year. I think we're already behind in terms of planting... We've been preoccupied with setting up the coop and enlarging the garden.
The (Future) Cob Oven!
7 May 2017 • Cob Oven, Eat, Make

Wanna hear about our next big project?
The COB OVEN!
What is a cob oven you ask? Pretty much an outdoor wood burning oven made out of cob. Cob = clay+sand+straw. Most people use these types of ovens for pizza but you can also make amazing bread and really anything you would make in a regular oven. I've heard of people who will make these in the morning and use them in the evening for a wedding or some sort of function. Or even kids who make their own tiny ones for a few cookies! Pretty intriguing right?!
A little while back I read an article in Taproot about a man who lived on a beach and made himself a cob oven. Every Friday he would host these pizza nights where he would make a giant batch of pizza dough and people would bring their own pizza toppings. He would spend the night popping these homemade pizzas into his homemade oven and the whole community would get together. So cool right? I love the idea of having something really functional in our backyard that we could share with friends, family and neighbours.
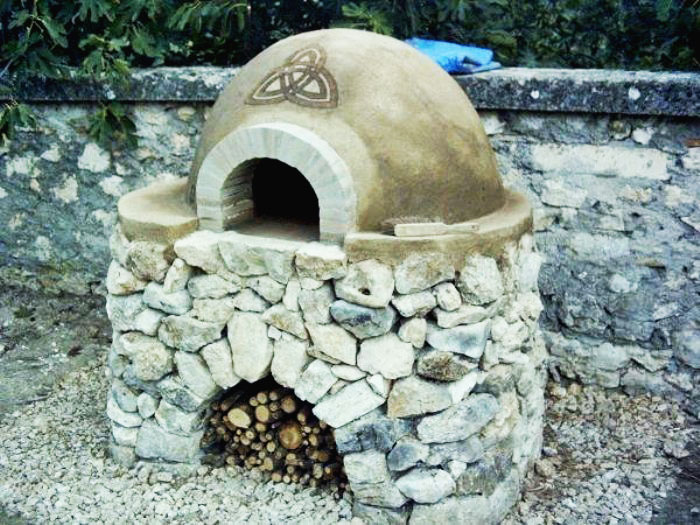
I've been wanting a cob oven in our backyard for a long while now and I recently went to a workshop that Little City Farm put on all about building cob ovens. It was so inspiring! Karin and Greg (of Little City Farm) made their cob oven (pictured above) for about $20. Crazy right?! Pretty much all of the materials can be repurposed or found with the only thing you really need to spend money on being the fire brick for the inside of the oven. The only catch is that cob needs to be somewhat protected by the elements so we would need to build some sort of roof/structure over it. That's the part that's rather daunting for me at this point.
At the workshop Karin and Greg said you could build the oven in about 2 weekends. With one weekend building the base which includes digging down 3-5 feet and filling it with urbanite, and the the brick "table" that it sits on. The second weekend would be used to build the oven part. Then you've got to keep the oven covered from the rain until you build a roof/structure over it.


I learned so much at the workshop in terms of the building materials, making the cob and the whole design process. I also just got this book (Build Your Own Earth Oven by Kiko Denzer) in the mail and oh man, it's so good! Denzer's book makes the whole process seem so easy and do-able! We had originally thought that building a cob oven would be a project that would have to wait till next summer, but after doing the workshop and some research we're thinking we'll try it out it the next few months! The great thing about cob is that even if we totally fail and the thing falls apart, you can just reuse the materials for next time. It's not like concrete where you use it once and it's done.
In the meantime though, I'm going to read up as much as I can and start collecting materials. This is definitely one of those projects I don't want to start until I've got everything gathered and I know exactly what I'm going to do. I'm excited to share the process here! Wish us luck!
p.s If you know of anywhere we could get some old bricks to repurpose, like a building being demolished, a (de)construction site, or anything like that, send us an email! theyoungnunn@gmail.com
Subscribe to:
Comments (Atom)