
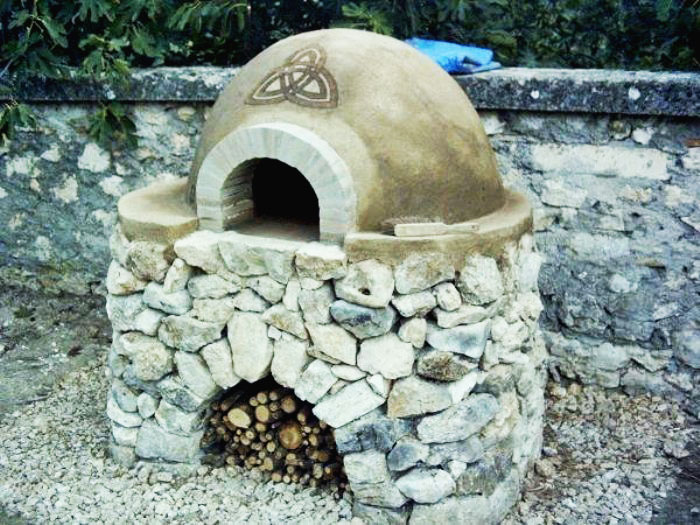
Ok so it looks like we're doing this cob oven project!
When we first had the idea to put one of these things in our backyard it was totally overwhelming. It's easy to look at a big project like this, that's totally out of our comfort zone, and think, "We can't do that! This is crazy! This will be way too hard!" So after spending some time reading about building a cob oven, we're just gonna dive into it. Start with step one and go from there!
So what is step one?
Well, for us it first meant contacting One Call to make sure it was cool to dig in our backyard. We're going to dig down about 3 feet to help insulate the oven and we would hate to ding a pipe or cable line. About 4 different companies came by over the course of last week to do a check and we passed. Yay! So we can dig now.
Second step... check out what kind of soil we have. The whole cob oven will be made up of mostly sand and clay that we dig up in the backyard. You could for sure buy sand and clay but if you have it in your backyard and have to dig down anyway, why not use what you have? We did a cool nerdy test to see what our subsoil was made of. All we did was dig about 30cm down (we did this when we were digging in our garden bed), took a scoop of the soil, put it in a jar, filled it with water and gave it a good shake. Then we just let it settle for an hour to see what we had. Have a look...


As you can see we have an almost perfect 3:1 ratio of sand to clay. Yay! It looks like we won't have to buy any clay or sand to get our ratios right. But we'll see once we start building.
After that: collect materials! We put out a message on Facebook for things like bricks, bottles and urbanite/rubble and got a really great response. People are amazing! We ended up getting a bunch of things we need.
That's about as far as we've gotten! Our next step will be to start digging and filling up the foundation.
So far, so good!
* top photo cob oven by Hendrik Lepel


Post a Comment